3. Version Control (Git)
Commit Message Guidelines
Purpose:
- Commit messages provide valuable context and history for changes made to the codebase. Clear and descriptive commit messages help developers understand the purpose and impact of each commit.
Guidelines:
These guidelines outline best practices for writing git commit messages. Consistent and informative commit messages help maintain a clean and understandable version history, making it easier to track changes and collaborate effectively.
DO
- Use Imperative Mood: Write commit messages in the imperative mood.
- Be Descriptive: Provide a clear and concise description of the changes introduced by the commit.
- Include Issue References: If applicable, reference related issues, tasks, or feature requests in the commit message.
DON'T
- Avoid Vague Messages: Refrain from using vague or ambiguous commit messages that do not provide meaningful context about the changes.
- Don't Use Personal Pronouns: Avoid using personal pronouns like "I" or "we" in commit messages.
PREFER
- Prefix Commit Messages: Prefix commit messages with a relevant type identifier, such as "feat", "fix", "chore", etc., to categorize the type of change being made.
- Use Conventional Commit Format: Prefer using the conventional commit format, as defined by Conventional Commits, to structure commit messages consistently across projects.
AVOID
- Avoid Excessive Detail: Refrain from including excessive detail or technical jargon in commit messages, as it can clutter the version history.
- Avoid Incomplete Messages: Avoid committing incomplete or work-in-progress changes without providing context or explanation.
CONSIDER
- Consider Breaking Changes: If a commit introduces breaking changes, consider explicitly mentioning them in the commit message to alert other developers.
- Consider Scope: When appropriate, include a scope identifier in the commit message to indicate the specific component or module affected by the changes.
Examples for Each Commit Type
The commit message should be structured as follows:
<type>[optional scope]: <description>

[optional body]

[optional footer(s)]
ref: https://www.conventionalcommits.org/en/v1.0.0/#summary
feat (Feature): Introduces a new feature or functionality to the project.
feat: Add user authentication featurefeat(auth): Add user authentication by google feature
fix (Bug Fix): Addresses and resolves an issue or bug within the project.
fix: Resolve issue with incorrect user permissionsfix(permission): Resolve issue with incorrect user permissions
docs (Documentation): Updates or adds documentation, such as README files, comments, or inline documentation.
docs: Update README with installation instructionsdocs(readme): Update README with installation instructions
style (Code Style) Implements changes related to code style, formatting, or whitespace.
style: Format code according to style guidestyle(format): Format code according to style guide
refactor (Code Refactor): Restructures existing code without changing its external behavior.
refactor: Simplify login component logicrefactor(login): Simplify component logic
test (Tests): Adds, updates, or fixes tests related to the project's codebase.
test: Add unit tests for user registrationtest(registration): Add unit tests for user registration
chore (Chores): Implements miscellaneous tasks or changes that do not fit into any other category.
chore: Update dependencies to latest versionschore(deps): Update to latest versions
struct (Folder Structure): Adjusts or refactors the project's folder structure for better organization and readability.
struct: Reorganize project structure for improved readabilitystruct(assets): Reorganize assets structure for improved readability
update (Updates): Updates dependencies, libraries, or other external resources used by the project.
update: Update library version to latest releaseupdate(library): Update version to latest release
enhance (Enhancements): Enhances or improves existing functionality or performance.
enhance: Improve performance of search algorithmenhance(search): Improve performance of search algorithm
revert (Reverts): Reverts a previous commit to undo changes that caused issues or unintended consequences.
revert: Revert previous commit that caused issue #123revert(issue123): Revert previous commit that caused issue #123
Branching Strategy
Purpose:
- A branching strategy defines how code changes are managed and integrated into the codebase. It helps maintain a clean history, enable parallel development, and facilitate collaboration among team members.
Guidelines:
- Adopt a branching model that aligns with the project's requirements and team's workflow (e.g., GitFlow, GitHub Flow).
- Use feature branches for developing new features or enhancements, bugfix branches for addressing defects, and release branches for preparing stable releases.
- Ensure that each branch serves a clear purpose and follows naming conventions (e.g., feature/
name, bugfix/name, release/version).
The main branches
At the core, the development model is greatly inspired by existing models out there. The central repo holds two main branches with an infinite lifetime:
- main
- develop
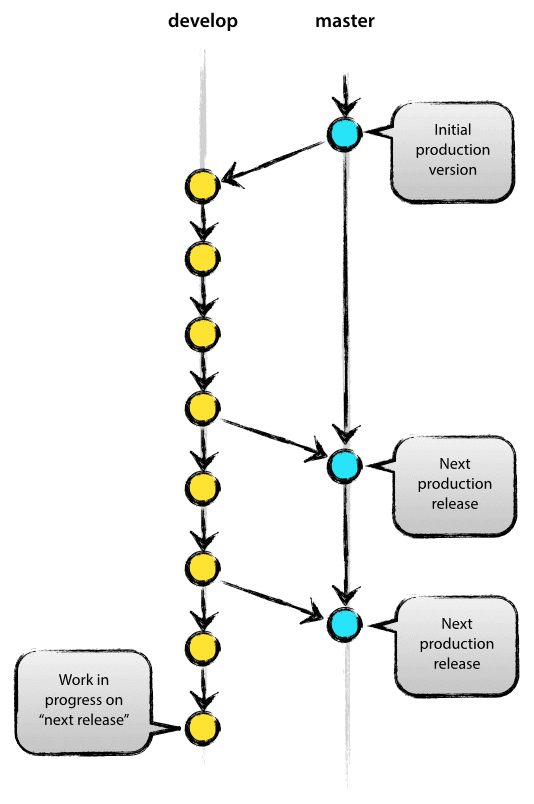
The main branch at origin should be familiar to every Git user. Parallel to the master branch, another branch exists called develop. We consider origin/master to be the main branch where the source code of HEAD always reflects a production-ready state.
We consider origin/develop to be the main branch where the source code of HEAD always reflects a state with the latest delivered development changes for the next release. Some would call this the “integration branch”. This is where any automatic nightly builds are built from.
When the source code in the develop branch reaches a stable point and is ready to be released, all of the changes should be merged back into master somehow and then tagged with a release number. How this is done in detail will be discussed further on.
Therefore, each time when changes are merged back into main, this is a new production release by definition. We tend to be very strict at this, so that theoretically, we could use a Git hook script to automatically build and roll-out our software to our production servers everytime there was a commit on main.
1. Main Branch
source: https://nvie.com/posts/a-successful-git-branching-model/
The main branch serves as the primary line of development and reflects the production-ready state of the project. Commits directly to the main branch are typically reserved for release merges.
- Propose: Use the main branch to represent the stable and production-ready state of the project.
- Process: Merge completed release branches into the main branch to deploy new versions of the software.
- Implementation: Merge from
release/v1.0tomain - Example: After thorough testing, the latest version of the software is merged into the
mainbranch for deployment.
2. Develop Branch:
The develop branch facilitates integration of ongoing development work. Developers create feature branches from the develop branch and merge them back in upon feature completion.
- Propose: Utilize the
developbranch for ongoing development and integration of new features. - Process: Merge completed
featurebranches into thedevelopbranch to integrate new functionality into the project. - Implementation: Merge from
featuretodevelop - Example: After implementing a new user authentication feature, the feature branch is merged back into the develop branch for further integration.
The Support branches
3. Feature Branches
Feature branches isolate development work for new features or changes. Based on the develop branch, feature branches are created and named descriptively to reflect the feature they represent. Upon completion, they are merged back into develop.
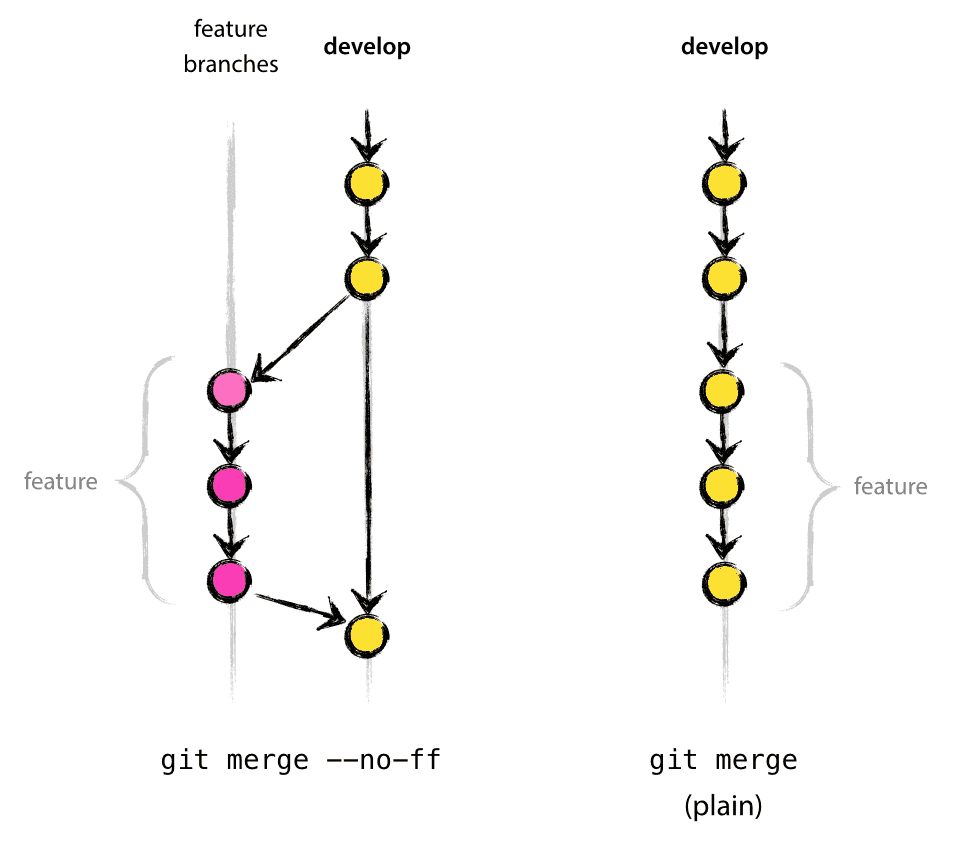
source: https://nvie.com/posts/a-successful-git-branching-model/
- Propose: Create feature branches to
developnew features or implement changes separately from the main development line. - Process: Implement and test new features within
featurebranches, then merge them back into thedevelopbranch once completed. - Implementation: Merge from
featuretodevelop - Example: A feature branch
add-search-functionalityis created from develop, developed independently, and merged back intodevelopupon completion of the search functionality.
4. Release Branches
Release branches prepare the codebase for a new production release. Created to stabilize the code and perform final testing, release branches are merged into both main and develop upon readiness, and then deleted.
- Propose: Use release branches to prepare and stabilize the codebase for new production releases.
- Process: Merge completed release branches into both
mainanddevelopbranches to deploy new versions of the software. - Implementation: Merge from
developtorelease/v2.0.0 - Example: After finalizing version
2.0.0, thereleasebranchv2.0.0is merged into bothmainanddevelopbranches for deployment.
5. Hotfix Branches
Hotfix branches address critical issues or bugs in the production environment. Based on the main branch, hotfix branches are created for quick fixes and merged into both main and develop once complete.
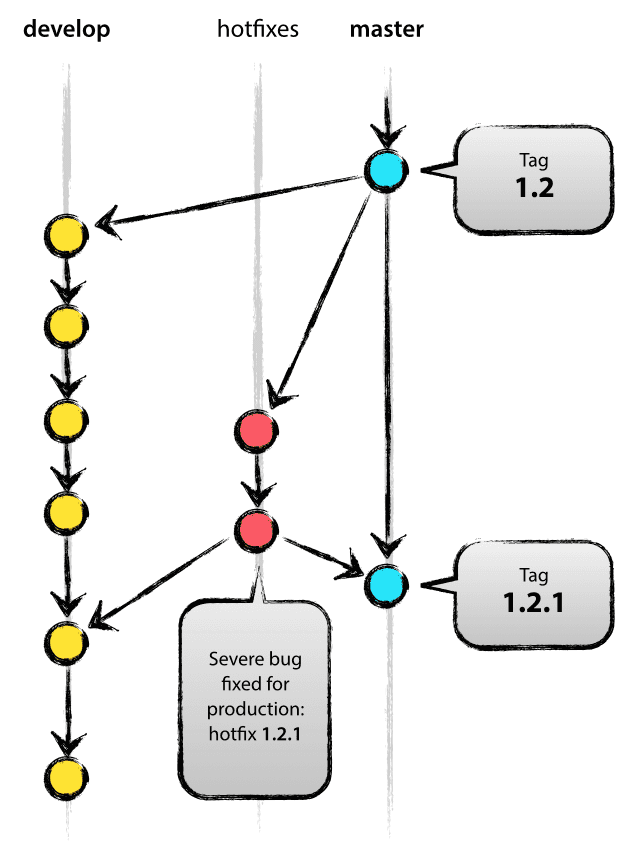
source: https://nvie.com/posts/a-successful-git-branching-model/
- Propose: Use hotfix branches to quickly address critical issues or bugs in the production environment.
- Process: Create
hotfixbranches from the main branch, apply fixes, and merge them back into both main and develop branches for deployment. - Implementation: Merge from
hotfix/fix-security-vulnerabilitytomainanddevelop - Example: A hotfix branch
fix-security-vulnerabilityis created frommainto address a critical security issue and merged into bothmainanddevelopto apply the fix.
Reference: https://nvie.com/posts/a-successful-git-branching-model/
Pull Request Guidelines
Purpose:
- Pull requests (PRs) facilitate code review, feedback, and collaboration among team members. Following consistent PR guidelines ensures that changes are reviewed thoroughly and integrated seamlessly into the codebase.
Guidelines:
- Provide a descriptive title for the pull request that summarizes the changes introduced.
- Include a detailed description of the changes, rationale, and any relevant context in the PR description.
- Assign reviewers to the PR based on their expertise and involvement in the affected code.
- Address any review comments and ensure that the PR meets the project's coding standards, test coverage requirements, and acceptance criteria before merging.
Submitting a Pull Request
-
Pull Latest Changes: Before submitting a pull request, pull the latest changes from the upstream repository to ensure your branch is up-to-date:
git pull origin main -
Push Changes: Once you're satisfied with your changes, push your branch to your forked repository:
git push origin feature/your-feature-name -
Create Pull Request: Go to the GitHub page of your forked repository and create a new pull request from your branch to the main branch of the upstream repository.
-
Pull Request Description:
-
Overview: Provide a brief overview of the changes introduced by your pull request.
- Checklist: Include a checklist of tasks completed, such as testing, documentation updates, etc.
- Related Issues: If your pull request addresses any specific issues, reference them here.
-
Additional Notes: Any additional information or context relevant to the pull request.
-
Review and Address Feedback: Be responsive to any feedback or review comments provided on your pull request. Make necessary adjustments based on the feedback received.
Additional Tips
-
Keep Pull Requests Small: Try to keep your pull requests focused on a single issue or feature to make the review process more manageable.
-
Follow Coding Guidelines: Ensure your code follows the coding style and guidelines established for the project.
-
Write Tests: Whenever possible, include tests for your changes to maintain code quality and prevent regressions.
-
Be Patient: Understand that pull requests may take time to review and merge. Be patient and respectful throughout the process.
Pull Request Example Template
Overview
This pull request introduces a new feature to the project that allows users to filter search results based on location. It includes updates to the search functionality and UI components to support this feature.
Checklist
- [x] Implemented search filtering by location
- [x] Added UI components for location selection
- [x] Updated documentation with usage instructions for the new feature
- [x] Conducted thorough testing to ensure functionality and compatibility
Related Issues
Closes #123
Additional Notes
This feature enhances the user experience by providing more targeted search results based on user-specified locations. It is designed to be intuitive and seamless, integrating smoothly with the existing search functionality.
Git Workflow Overview
The team follows a Git workflow based on feature branching and pull requests to manage code changes efficiently. The typical workflow consists of the following steps:
-
Create Feature Branch: Create a new feature branch from the
developbranch to work on a specific feature or task. -
Implement Changes: Implement the desired changes in the feature branch, following coding standards and best practices.
-
Submit Pull Request: Once the changes are complete, submit a pull request to merge the feature branch into the
developbranch. -
Code Review: Reviewers conduct a thorough code review of the pull request, providing feedback and suggestions for improvement.
-
Address Feedback: Address any feedback or comments raised during the code review process, making necessary revisions to the code.
-
Merge Pull Request: After receiving approval from reviewers and resolving any discussions, merge the pull request into the
developbranch. -
Release to Production: Periodically, create release branches from the
developbranch to prepare release candidates for production deployment.
By following these version control guidelines and workflow practices, the team can collaborate effectively, maintain code quality, and ensure smooth integration of changes into the codebase.